A Reef is Born

Saturday afternoon, after finalizing the power cord layout and a trip to Fry's to pick up some saddles for velcro and zip ties, the tank was ready to go. I stopped by the LFS and rounded up ~25 gallons of mixed saltwater (at 1.026 sG), my hand-picked live rock, and two bags of Aragonite live sand.


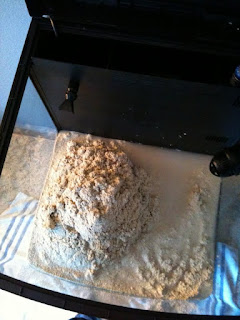
First went the sand. I was wary about opening the second bag but went with it in the end. The sand bed ended up between 2 and 3.5 inches deep. After some negotiating and a little trial and error, I found a way to stack the rocks that gave me the desired layout- a bridge, several caves, hiding places, and no rocks leaning against glass. There is still room for another piece if I find one that has a good set of corals on it, and there is also open space on the sand bed for an open brain or plate coral... something that will fluoresce under the LED moon lights. The water was last; I put a clean glass plate over the rocks and poured the water onto it so as not to disturb the sand/substrate... an old trick that any aquarium keeper should know.


Altogether the whole process of aquascaping and filling the tank took approximately an hour and a half. As expected, the water was cloudy and the only shapes I could discern were rocks a few inches from the glass. Over the next day, suspended particulate settled down and eventually cleared up- earlier than I thought it would. By Sunday afternoon it was almost totally clear. The timers I bought are working well and all seems to be in order.


Succumbing to impatience, I did pick up some livestock a day after the tank had been set up. There are ten red-legged hermit crabs to start off the clean-up crew, a Scarlet Skunk Cleaner Shrimp (Lysmata amboinensis), and four small frags: Red & Green Zoanthids (not sure on the species), Star Polyps (Pachyclavularia violacea), and some tiny purple clove corals (Clavularia sp.). Not having to worry about liverock die-off or a full tank cycle is very convenient... minor cycles will happen when the bio load increases. I wouldn't recommend risking this kind of thing to anyone else, though. The stock advice is "wait at least a week".


Everything was properly acclimated- temperature matched and a cup of tank water mixed into the bag before release. The Zoanthids were opening up within an hour of being introduced to the tank, and by Sunday evening the cloves and star polyps were also opening up. I had to redirect the flow from the Koralia 1 and now it is pointing laterally across the back wall of the aquarium (towards the output of the stock pump). This creates a loose rotational current around the tank without too much direct flow or turbulence in any one place. With the stock pump and the Koralia, the total flow in the tank is roughly 22 times the tank volume per hour. That's lower than some SPS-only tanks, but way higher than your general minimum requirement.

I'll post in the coming days as I test water.

Tank almost ready to go...

So I'm trying to resist the temptation to fill the tank prematurely. It's more or less ready to go now, but the OCD part of me wants to put a couple of zip-tie anchors towards the bottom of the back of the stand so that the cables have proper drip loops... This is a hobby wherein dangerous amounts of electricity are put right next to a bunch of saltwater- it pays to be safe.

Today I picked up a workshop-style Belkin power strip with 10 outlets, and a couple of heavy-duty analog timers with two outlets each. One of them is for a daylight cycle and the other is for night; the PC lighting will be on from late morning until late evening. I really want to enjoy the tank under full lighting after work and at night, but I know that some of the corals are going to be a little bit more sensitive to the light cycle... time will tell if I need to reduce the amount of light going into the tank. The night cycle is going to power the Nano Glo in chamber 2. This setup should help to stabilize the pH by stimulating growth of the Chaetomorpha. The heater, main pump, Koralia-1, and moonlight LEDs will be on 24/7.

Tomorrow the plan is to finalize the cabling as early as possible and then pick up the water, live sand, live rock, and some Chaetomorpha from my LFS. I picked out my rock ahead of time and it's been sitting in the sump of a huge, well-established system for a few weeks. I'll also be picking up a API test kit. Given that a lot of the water and live rock is coming from an established system, my tank won't do a full cycle but there will definitely be fluctuations while the tank reaches equilibrium. I anticipate a few days for the cloudy water to clear up, and will perform daily tests for the first week just to make sure the parameters are right. Sometime after the water clears up, I'll be adding the first couple members of my clean-up crew.

Testing for leaks

I haven't had a chance to write up a livestock plan yet. As it happens, my Biocube 29 arrived last week and was happily pumping water for a couple days while I tested it for leaks. I also picked up a Koralia-1 and a Jager 100-Watt heater from my LFS.

Oceanic has clearly been listening to its customers- I was greeted by a very nice and very convenient window on the back of the tank right over most of the center of chamber 2... this was a mod that many people had to do themselves with a razor blade, scraping off the coating and leaving scratches and ragged edges. Now my Nano-Glo has a perfect spot to sit and light up my Chaetomorpha at night. I did have to mod the chamber 1 -> chamber 2 passage so that the whole width of the chamber passes water instead of the stock ~1 inch width. In the second picture below there is a faint dotted red line marking where I cut the wall between chamber 1 and 2 to allow more water to pass through.


Sunday afternoon, and completely on a whim, I decided to visit one of the nicer fish stores I've ever been in. If you are ever in Dublin, California, stop by Aquarium Concepts on Amador Plaza Rd. I walked in and the first thing I saw on the counter was a JBJ Nano-Glo! This was an item I wasn't able to find in stores, and online it cost $59.99 and up. Aquarium Concepts sells them for $49.99. Brick and Mortar prevails, for once.


After testing the tank at capacity for a day and a half, I emptied it of water and moved it onto the stand, which I had assembled a couple nights before. The stand took no more than 40 minutes to put together.. very simple construction. It's sturdy and I don't think I will be having problems with it. I realized that there will be at least seven power cables draped down the back side of the stand and fishtank; I'm pretty OCD about cable management, so I'm going to have to figure something out to handle all of the cables and ensure that there are drip loops before the power strip. All cables are routed into the bottom entry point of the stand where my power strip and timers live, and then the power cord of the strip is the only thing that goes out to the wall. Should look pretty clean when it is all done!

Currently the plan is to get my cabling all sorted out between now and the weekend and then fill the tank and do my major aquascaping sometime this Friday-Sunday.

Pulling the Trigger

I've finally ordered my Biocube 29. After weeks of research reading forums, sites, reviews, and figuring out possible modifications, I figured it was time for action.

The current plan is:
  • Lighting: Stock. I'll upgrade later, when high-power LED lighting is more widely available and cheaper. At the moment they're several hundred dollars for a DIY kit, but they are extremely efficient, have great output, and last ~50,000 hours. The savings really add up.
  • Pump: Upgrade to Rio 6hf. It's got low wattage (imparts less heat into the water) and very high flow- 350gph. I am going to try and remove the elbow in the return path because it reduces flow, and use flex tubing instead. I'll also replace the output with Loc-Line; a Y splitter and a couple of flared outputs.
  • Powerhead: Korallia-1 (or a Korallia Nano) for additional flow.
  • Refugium: Scrape off the coating/plastic on the back glass that is obscuring chamber two and stick a JBJ Nano Glo on the back. Stick some egg crate in the bottom and turn it into a refugium. I will grow Chaetomorpha in there to help handle nitrates and phosphates, and the dedicated lighting will really help. The Nano Glo is the best product I've found for this.
  • Open up the gap between Chamber 1 and 2 for more flow. Just a simple cut with a razor blade. I'm presuming that this is practically necessary with the pump upgrade.
  • Junk the bio-balls and the stock filter pads. I'll go with some filter floss, and if I really need it a bag of Purigen or activated carbon in the top of the Chamber 2 refugium.
  • Heater: ~100Watt, in Chamber 1. I'll need to remove the false bottom to fit the heater.
These are all somewhat tentative. I still need to get the tank and test it for leaks before I make any of the more significant modifications.