The Way Here & The Way Forward

Life, being the multifaceted and unpredictable beast that it is, has been complicated lately (in the best possible way) and I haven't had time to update. A lot has happened in the tank since my last post and so I'll try to summarize everything in one huge update.

I never posted about this guy even though I got him in April... a Blue Spotted Jawfish (Opistognathus rosenblatti). I thought he deserved his own long post with a video (which I did post) and explanation of his habits and behaviors (which I didn't) but it never manifested. The brief couple of months he was in my tank were very enjoyable for all and I miss his antics, as annoying as they sometimes were. It turns out brain corals really don't appreciate being repeatedly covered in sand.

These fish are known to be jumpers and he eventually managed to find an opening in my makeshift tank cover (for the past few months I have not been using the stock Oceanic BC29 hood, which I'll cover later in this post). He took an ill-fated leap and, as we say in the hobby, went carpet surfing. Rest in peace little buddy.


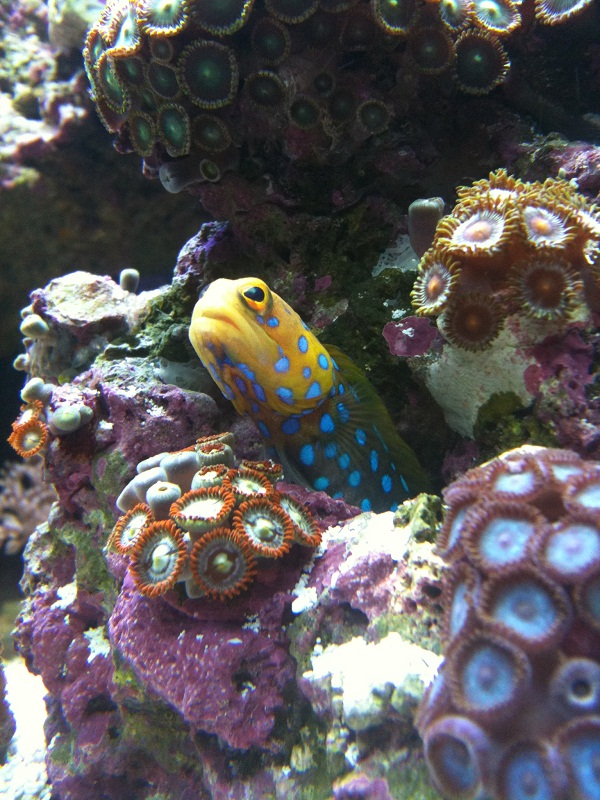
Despite being one of the most expensive fish I've ever bought, I do intend to keep another when I have (much) more space and a suitable environment in some future tank. It is one of the most interesting, beautiful, and personable fish I've seen yet. If you're interested in keeping one, just be prepared to have your sand constantly rearranged to his or her liking.

My two Ocellaris clowns, the first fish I brought home when my tank was first finishing it's initial cycle, had grown to twice their original size and were becoming quite aggressive. I suppose it's hard to give everyone their own space in a 29 gallon cube. Longer tanks are probably better suited to the creation of distinct territory or at least breaking up the line of sight.

Even though they couldn't intimidate the Jawfish due to his size, both clowns would try to threaten him whenever he got close to the torch coral (their surrogate anemone). They also wouldn't let the female McCosker's flasher wrasse out of her corner. This stress and harassment caused her to frequently leap out of the water... eventually she made it over the false wall (as I mentioned in a previous post) and was no more. They even intimidated the male McCosker's, but he usually held his own. The female clown attacked and bit my hand whenever I had it in the tank doing maintenance. They weren't even fully grown yet.

Thus came the decision to sell them as a pair... and I did. hopefully right now they are living happily in someone else's fish tank, biting someone else's hand, being vicious hellions towards their tankmates, etc.

After all was said and done, I was left with a lone male McCosker's flasher wrasse. The difference in his behavior once the tank was his and his alone was profound... he was always comfortably out and about, swimming in the front of the tank, being curious, and would follow me around from one side of the room to the other. I fed the tank far less and was subsequently able to keep my water quality higher. I decided at that point that having one happy fish was better than pushing the limits of space and filtration for the sake of variety.

Then I changed my mind and thought I would keep a species tank of one male McCosker's with a harem of a few (2-3) females. I located and purchased said "females", but they turned out to be "males". Whoops. Three males in a 29g is two too many, to say the least. Paracheilinus mccoskeri are protogynous hermaphrodites - meaning that they start out as female and the dominant female changes into a male if there is none present. Unfortunately for my trio of dudes, their remarkable transformation from this...


...into this...

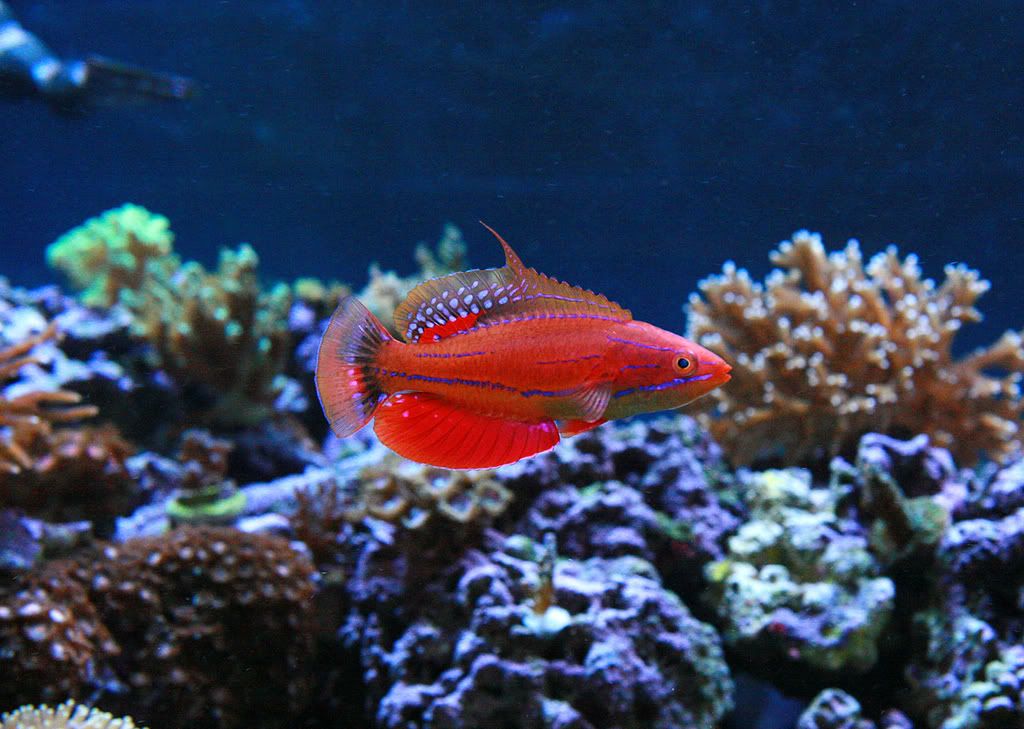
(This is not my photo! Posted by Rickyrooz1 on the ReefCentral.com forums)

...is irreversible. Once they embark on the journey to becoming male, their bodies can not naturally revert to female. According to a crew member from WWM, the transformation from male to females has, however, been induced via hormones in a lab environment.

In any case that was sort of the end of my McCosker's species-tank pipe dream. Having a single male McCosker's isn't really worth it because the main draw of these fish is their social interaction and the male displaying for females. Without females, males quickly lose their brilliant coloration and become a rather drab. Furthermore, finding a reliable source of female McCosker's is pretty difficult. My LFS had not seen one for several months. I decided that I would remove all three males and sell them, leaving my tank sans-fish for the time being

As anyone who has ever kept fish in a reef can attest, capturing anything with a net can be destructive and frustrating. For me it involved removing a lot of rock and live coral, and about half an hour of precision net maneuvering (it's all in the wrist). After all was said and done, my tank was in a state of chaos:


I waved goodbye to my fish and his two reluctant, unlikely companions, and sold them to my LFS where they would hopefully each find a more suitable (and separate) home. Here is my last photo of them, looking quite glum, as we parted ways:


Sometime during all of this activity, I moved to a new apartment unit. The whole moving process probably deserves its own post but will not get one, so I'll just say that it was a pain in the ass... but not so much that I can't do it every time I change living space, an inevitability in apartment living. This was not only a relatively small (and therefore easy) tank to move, but I was only moving to a new unit in the same building so there were no cars or long distances involved, which really complicate matters. For me it was a simple process:
  1. Have 15-20 gallons of water pre-mixed and pre-warmed at the destination, because you'll need it (part of this process involves a water change). Also have several towels you don't care about on the floor and at the ready.
  2. Drain roughly 15 gallons out of the tank, put it in clean 5-gal buckets.
  3. Remove the large loose live rock (with attached coral and all). Place it safely in the buckets of water removed from the tank, making sure the coral will not be damaged or broken while moving.
  4. Capture all  livestock and add it to one of these buckets.
  5. Remove the rest of the water, down to the sand, and discard.
  6. Move livestock to the new unit.
  7. Move tank and stand to the new unit.
  8. Refill the tank using mostly new water; reintroduce the live rock and coral that was removed.
  9. Reconnect all electrical equipment.
  10. Reintroduce livestock.
  11. Monitor temperature, water chemistry (especially nitrates)... this continues for a couple of weeks after the move.
  12. Clean up the mess.
  13. Admire your tank in it's new location.

In that last picture you might notice the Tek-Light over the tank instead of a BioCube hood. A couple of months ago one of my stock ballasts suddenly died, and the one working bulb was insufficient to keep the corals healthy. Oceanic (aka Central-Aquatics) was quite good about sending me a replacement (once I sent them a copy of my receipt), but as soon as I replaced the first failed ballast, the other one died. How annoying. In subsequent troubleshooting I found out that there was also some sort of wiring problem within the hood itself which left me with yet another dead ballasts (a bad connection and/or short, possibly?).

I was also going to be due for bulb replacement to the tune of ~$45. That's a lot of bones to cough up when there are do-it-yourself alternatives/upgrades. Given the frustrating situation with the stock hood,  I began my planning.

In the interim two months I had been using a 4-bulb 96W PC bulb Sunlight Supply Tek Light with 3 actinics and 1 white 10K bulb (see above), and now am using a 75W Metal Halide 12K bulb in a Current USA Sunpod ... both of which were graciously lent to me by a friend... neither of which are permanent solutions. They're just a temporary measure to keep my coral alive and happy while I plan the permanent solution. I did have to repair the Sunpod before it worked:


I don't really want to deal with any more failed ballasts, Oceanic customer service (polite and helpful as they may be), continual replacement bulbs, or mediocre PC lighting. I want to double or triple the amount of photosynthetically viable light in the tank to support demanding coral. I also want to go back to a tight-fitting lid to limit evaporation and a manufactured look. The only real option, then, is a high-power LED retrofit into the stock hood. This is a pretty expensive and involved endeavor and will get its own write-up when I'm done, but it's underway. I'm excited!

For now the tank is empty and a little bit boring. I miss having a single fish in there owning the whole place as if it was a mansion and giving me the stink eye every time I walk by without feeding it. I won't be able to resist getting one for much longer, so a lot of thought is going into what is a suitable inhabitant. It has to be a fish that doesn't get too big, won't eat coral, doesn't hide very much, and doesn't prefer company (like Anthias do). More to come.

More Magnetism, and My Father Comes to the Rescue

A couple months ago, I decided to go forward with an idea that I had been contemplating for some time. Until that point, the back wall of the tank above my live rock was relatively barren except for coralline algae- it seemed to be a prime spot for something new, and I thought Aqua-Mags might be the right tool for the job.

I wasn't sure which coral to mount, nor how to mount it, and entertained several ideas before settling on my Green Star Polyps. GSP is a very cheap, very common, and very hardy coral that grows quickly and encrusts over anything, including glass. It will even form a mat across sand. The small colony that I had originally purchased as one of my first specimens had already completely covered the rock that it came on and was trying desperately to find somewhere to continue growing. Many people warn against letting GSP grow unchecked on rock because it multiplies so fast that it becomes a nuisance. I wasn't afraid of handling or cutting up the colony for this project.

Another decision was what, exactly, I would put these polyps on. I settled on some thick branched dead coral skeleton from my LFS. My reasoning was that once the GSP encrusts it would look interesting and provide depth on that side of the tank. I bought four or five fragments of different sizes and shapes and rearranged them until I was satisfied. Using some cyanoacrylate glue and a healthy lump of reef-safe two-part epoxy, I put together the dry liverock over several days and attached one magnet near the base.

Before gluing...
Epoxy drying, piece by piece.
Almost done - just a couple of small pieces left.


Using only one magnet was wishful thinking at best, but I wanted to experiment with how well (or poorly) a single magnet could hold this structure taking into consideration the buoyancy from immersion in saltwater. It was a lot heavier than I anticipated. After fiddling around for a while I concluded that there was no way that one magnet would hold the structure upright on the wall. Another magnet was needed for friction- to provide an additional point of contact that would prevent the whole thing from spinning due to torque from gravity. This introduced the same problem that I had tackled with my first magnet-mounted liverock. The two magnets have to be perfectly flush, their surfaces coplanar, to maximize the hold. Bad news... I didn't do a great job on the second magnet, and it wasn't close to flush. The result was two magnets that did no better a job than a single one because only one at a time was fully pressed against the wall.

All finished, with second magnet. Bummer.

My disappointment with this setback (and lack of precision and foresight on my part) caused me a few days of annoyed brainstorming on how to salvage the project. It certainly wasn't going work work as intended and I had no more magnets to start over. My only recourse seemed to be to saw through the epoxy holding the magnets onto the liverock, break the magnet pair apart, re-epoxy them on a small piece of glass so that they set and dried flush, and then reattach them to my liverock. That seemed like a huge pain in the ass... and it would have been, if it wasn't for my father.

Enter my dad- a precision machinist by trade and overall bad-ass handyman by reputation. He took one look at the piece and mumbled something about one side being "a couple ten-thousandths high". After I explained my solution which involved a Saturday afternoon chock full of sawing and regluing, he thought for a moment and left the room. When he came back he had a large sized piece of almost perfectly flat granite that was lying around in the tool shed and some fine grit sandpaper. Using the sandpaper and the flat surface of the granite, we lapped the plastic surfaces of the Aqua-Mags by maintaining even pressure and slowly grinding the plastic casing in smooth figure eight patterns. After about twenty minutes of this, I gave the magnets a shot on a glass window and they were completely coplanar. The project was saved - I would never have thought of that on my own. Unfortunately I don't have any pictures of the process.

All fixed! Here I am figuring out final placement. Note the Koralia-1 powerhead... Hideous.

Next was the last and probably simplest task of breaking apart my colony of Green Star Polyps. It was actually a tremendous mess; I used pliers to shatter and break apart the dead coral on which the GSP was growing, and discovered several critters living inside. I avoided (purely by luck) touching either of the two bristleworms with my bare hands. The needle-like bristles which line their body can cause irritation if they touch skin. Critters having been returned to the tank, I glued the fragments of GSP all over this structure over the course of a few minutes and left one small portion of it on the original rock to regrow.

Gluing pieces of coral.
After a couple weeks. Not much growth. Also note the replacement to my Koralia-1, a Vortech MP10.

Rampant growth after a couple of months.

One issue this project raised was my Koralia powerhead. I was happy with its performance but it became an eyesore once this coral was in place. I needed something slimmer, more powerful, and way sleeker... a Vortech MP10 fit the bill perfectly! I'm sure I can use the Koralia later on.

Before & After - A 35 Week Retrospective

It seems like it's been forever. Roughly thirty-five weeks have gone by since I filled my tank with sand and water. This is my first reef, and the maturation/cycling process is far more intricate and varied than a freshwater setup. All sorts of critters have begun to reproduce in the tank... copepods and amphipods, various algae and diatom blooms... the rise and fall of these population explosions is frequently observed in new tanks and referred to as "New Tank Syndrome" (usually only when things go badly, though).

Seeing my first 'pod crawling around on the glass oh so many months ago was an exciting moment. Eventually coralline algae started spreading all over the rock and walls of the tank. Pink, violet, purple, and maroon colored splotches that cover everything but the corals and sand. My tank is still far from being "mature", but it has certainly gotten part of the way there.

Over time I have discovered many more interesting creatures in my tank, none of which I purchased or acquired on purpose. Stomatella snails, vermetid snails, spirorbid worms, hair worms, bristle worms, miniature sea stars, miniature brittle stars, unidentifiable polychaete worms, sponges, sea squirts, and tiny white snails to name a few. Most of these "hitchhikers" are either beneficial or at worst, harmless. In just 29 gallons of water and about 570 square inches of sand, a whole teeming ecosystem has formed and is reaching a careful balance. The coralline algae is encrusting all of my rocks, and water parameters are within range and steady.

I thought it would be interesting to do a before and after post, where I compare my earliest photos of some of these corals with the latest ones to compare size and coloration. I've also gotten quite a bit better with the camera, so forgive some of the early blurry shots. :)

Green Star Polyps
The first corals I bought, I've been careful to segregate this colony of GSP (Green Star Polyps) from the rest of my main rock structure. It grows so quickly and overwhelmingly that once it is on a rock, it is difficult to remove and will literally take over. This colony quickly covered the small rock that it came on. I later broke up this colony for project that I will hopefully post about sometime next week. There are some spoilers in some of the pics later...


Zoas
My Zoanthid colonies have taken off. There are already polyps budding off of the main colonies and spreading around the adjacent rock surface. I want to angle this rock to give the front face more light; you can tell a huge difference in the growth rate of the polyps on the top of the rock (facing the light) than on the face that only receives glancing, limited lighting.


Dendros
The Dendrophyllia are extremely slow to grow and reproduce, especially with a more relaxed feeding regimen. They are not photosynthetic and rely on food for all of their nutrients, so feeding more often will spur growth. The two babies near the base of the main polyp are significantly larger than when I got them, but I recently saw a couple Dendros the size of a golf ball in another person's tank. I'm wondering how long it takes for them to get to that size. Years, I would imagine.


Hyacinth Bird's Nest
Don't ever let anyone tell you that you can't grow SPS under the stock lighting on a Biocube 29! It may not be ideal PAR and/or spectrum, but this colony is flourishing and has branched out quite a bit from the small twig that I first introduced. You can see the Neon Bird's Nest in some of these shots.


Neon Bird's Nest
These two frags are from different colonies and at first had a different appearance, but they have more or less converged in coloration and polyp extension. They have almost tripled in size.


Acanthastrea
This coral looked nice when I bought it, and then had some sort of (possibly shrimp-related) problem and began to deteriorate. After a couple of weeks I thought I'd lose the whole thing, but the tissue death stopped and it has since regrown with many more young polyps growing where the original had some tissue necrosis.


Montipora Capricornis
At first it isn't obvious but the Monti has grown about a centimeter in radius. I found a nudibranch in my tank that was munching on the Montipora digitata, and I'm hoping that the little bastard didn't lay eggs or something. They can wreak havoc on Monti corals and usually start at the base where they are difficult to find.


Torch
My Euphyllia glabrescens appears to love its perch high up on the glass. It's much closer to the light and receives far more photosynthetically active radiation at that position than it would near the sand. The flow appears to be ideal as well. It has grown a LOT since I got it. Tentacles on one of the polyps extend four inches or more, waving around in the current. Easily one of the more beautiful corals in the tank right now.


Duncan
The Duncanopsammia axifuga was originally three main polyps with a few babies at the base. It's now grown into a colony of several polyps, each facing a different direction. This colony will continue to grow and eventually will need to be fragged.


Meteor Shower
A very fast grower, this Cyphastrea (aka Meteor Shower) has grown over the glue fastening it to a rock and is already spreading rapidly with new polyps appearing both along the edge of growth as well as within the existing tissue of the coral. It is easily out competing the small purple cloves. This is one of my favorite corals in the tank because of it's unique look and the rock it is growing on really showcases its texture and color.


Purple Cloves
These "cheap" coral are small and easy to take care of. They've already spread in one place in the tank (next to the Cyphastrea) and I moved the originating rock to the other side of the tank to have them grow there as well. You can see how much they've spread over the rock in the picture above. They'll soon be overgrown by the Cyphastrea.

Christmas Favia
There was a portion of the skeleton that had been stung in the previous owner's tank, and the colony had receded from that area. Within the time that it has been in my tank, the two or three nearest polyps split and spread into this area, repopulating the preexisting skeleton. There are some pictures below, both before and after. It's really cool to see this process unfold over time, and a sign that the  coral is healthy and happy. I left it in the same place in my tank for so long that it has begun to grow on to the adjacent rock.


Green Palythoas
I got this rock on a bargain and wanted to see how quickly this coral grew. It's an extremely hungry coral and can put away quite a bit of food- it's especially good at catching particles because of the way the nematocysts are positioned and sized. The polyps have shrunk a bit in size and increased greatly in number.


Neon Green Toadstool
This isn't actually my coral; I am "borrowing" it from my friend to let it grow out in my tank. They're slow growers, but in the time that has passed since I added it it has more than tripled in overall size. These can get quite large and look really nice under ideal lighting- the tips of each tentacle fluoresce bright green.


There are many other corals in the tank that have grown and change but this is already too many pictures. My Lobophyllia open brain coral in particular is much larger than it used to be and has a couple of new mouths.

This hobby can very rewarding with time, patience, and diligence. It can be equally devastating (and costly) if you don't keep at least minimal tabs on what is going on within the closed system of the aquarium. Parameters can spiral out of control within hours, heaters can fail, poor plumbing can suddenly leak, and it all crashes down. Here's hoping these essentially immortal creatures don't come to some unlucky fate on my watch. :)